Install Oxwall on Mac OSX Lion
Install
Oxwall on Mac OSX Lion
In
order to install Oxwall correctly you must have the applications
below installed the running on the your machine.
Mac
OS X Lion comes with both Apache and PHP preinstalled, but they're
not enabled by default. The following instructions below should help
you get up and running.
- Apache WEB server, version 2.0 or higher. ( http://httpd.apache.org/download.cgi )
This
is very easy task to perform but before you can enable PHP on a Mac,
you first have to enable Apache. Fortunately this is extremely easy.
If you would like more information about Apache on the Mac you can
read
more here.
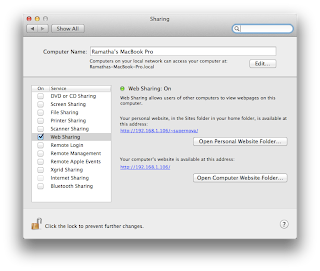
1.)
Click the 'System Preferences' icon in the Dock.
2.)
Click the 'Sharing' icon in the Internet & Network section of the
System Preferences window.
3.)
Place a check mark in the ‘Web Sharing’ box.
That's
it! If you want to test if it worked, point your browser to
http://localhost/ and you should see the standard Apache test page.
- MySQL 5.0 or higher. ( http://dev.mysql.com/downloads/ )
- Mail Server installed: SendMail, Exim or other. ( http://www.exim.org/mirrors.html ) but I did not follow this step this step since I`m only installing the application on my local machine.
- Cron ( http://en.wikipedia.org/wiki/Cron )
Actual
installation of Oxwall
Download
the latest Oxwall release from http://www.oxwall.org/download but do
not unzip the the downloaded packacg before change the attr of the
file. The main package is available in zip format, which can be
extracted using most compression tools.
Open
a terminal and change the attributes of the file:
- xattr -l /applicationPath/<applicationName>.app (to view file attributes)
- xattr -d com.apple.quarantine /applicationPath/<applicationName>.app (this will remove an extended attribute manually)
The gotchas
- Change attribut on the Oxwall.zip before extracting the files
sudo xattr
-d com.apple.quarantine oxwall-1-1.3.1.zip or ls -l@ oxwall-1-1.3.1.zip
- Modify .htaccess file by granting it read and write permissions.
- modify httpd.conf file or uesr.conf file (located in /private/etc/apache2/users)
Use your favorite text editor to edit the file. From the File menu, select Open Hidden.
In the Open dialog box, select All Files from the Enable drop-down menu. Then
navigate to your Macintosh HD:private:etc:apache2:httpd.conf, and click Open, shown in the
screenshots below:
From this point forth you can continue installing Oxwall by following their full Oxwall installation instructions at http://docs.oxwall.org/install:manual_installation
Note:
Don`t forget to setup a cron
job.
MORE
INFORMATION
================
-
See full Oxwall installation manual:
http://docs.oxwall.org/install:manual_installation
-
Install Oxwall on your local PC:
http://docs.oxwall.org/install:local_installation
-
Install Oxwall without any downloads:
http://docs.oxwall.org/install:auto_installation
-
Cron configuration guide:
http://docs.oxwall.org/install:cron


Good job Ramatha! I'm looking forward to see more posts of you!
ReplyDelete